M5Stack でGASからデータをもらう
tl;dr
M5Stack でGASからデータを (POST/GET で) 受け取ろうとする際、ContentService を 使うとページがリダイレクトされてしまいます。リダイレクトは micro Python では サポートされていないので欲しい物が受け取れません。しょうがないので HtmlService で workaround しましょう。
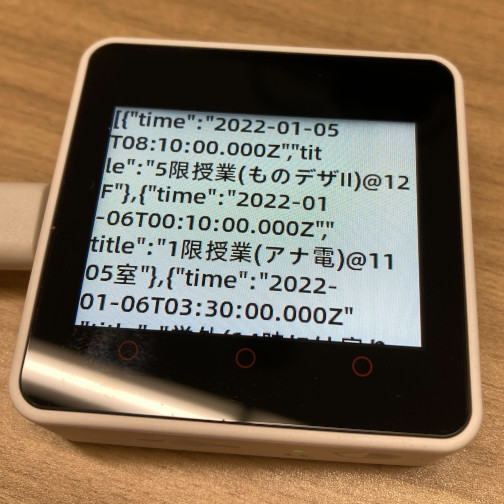
Googleカレンダーを表示したm5Stack
概要
M5Stack は UIFlow (Blockly, Python) で簡単にプログラミングができて Wi-Fi にも つながるので IoT 的な工作にとても便利です。とは言え、いわゆるリッチな OS・実行環境 ではないので各種クラウドサービスを使おう、と言う場合に困難もあります。
例えば Google カレンダーの情報を受け取りたい、と言う場合、Ruby や micro じゃない Python を UNIX 系 OS で使えるなら Google 提供のライブラリで簡単です。ところが これは M5Stack ようには提供されていません。一番低レベルな REST API なら使える はずですが、これは認証まわりが複雑でとてもやってられません。
そんなときに便利なのが GAS (Google Apps Script) です。GAS は Google のサービスに 簡単にアクセスできるので、これを使って面倒くさい認証を回避する、 「特定の機能専用APIもどき」(悪い言い方をするとバックドア)を作れます。 この記事では Google カレンダーの情報をJSON形式で取り出す APIもどきを実現します。
素直なやり方 (M5Stack ではダメです。)
GAS を webページとして公開して、POSTすると JSON が返るようにします。 これだけでいいはずです。
function doPost(req) {
  const now = new Date();
  const tomorrow = new Date(now.getTime() + 48 * 3600 * 1000);
  const events = CalendarApp.getCalendarById("ここにカレンダーIDを書く@group.calendar.google.com").getEvents(now, tomorrow);
  const resp = [];
  events.forEach((e) => {
    resp.push({time: e.getStartTime(), title: e.getTitle()});
  });
  return ContentService.createTextOutput(JSON.stringify(resp));
}
試してみましょう。これをデプロイして curl コマンドで curl -X POST https://script.google.com/中略/exec
……あれあれ?変な html が返ってきます。そう、これが罠なのです。セキュリティ上の理由らしいのですが、
リダイレクトされています。幸い curl コマンドはリダイレクトに対応できるので再度やってみましょう。
yagshi@awesomehost:~$ curl  -d '' -L https://script.google.com/中略/exec
[{"time":"2022-01-05T08:10:00.000Z","title":"5限授業(ものデザII)@12F"},{"time":"2022-01-06T00:10:00.000Z","title":"1限授業(アナ電)@1105室"},{"time":"2022-01-06T03:30:00.000Z","title":"学外(14時には戻ります)"},{"time":"2022-01-07T02:00:00.000Z","title":"2限授業(院)@201室"},{"time":"2022-01-07T03:30:00.000Z","title":"on-line会議"}]
ばっちりです!
問題点
「幸いcurlコマンドはリダイレクトに対応できる」のですが、
不幸にして micro Python の urequests.request() はリダイレクトに対応しておらず、
したがって M5Stack の UIFlow ではふつうにやってもダメ、となります。
そこでContentService じゃなくて(リダイレクトしない) HtmlService を使います。
ただ、ここにもいくつか面倒くさいことがあります。
- html 文書としての構造が追加される。
- さらに sandbox の iframe に押し込まれる。
- 記号類がエスケープされる。
具体的には単に、{"answer": 42} というオブジェクトを JSON で返したいとして、
function doPost() {
    return HtmlService.createHtmlOutput(JSON.stringify({answer: 42}));
}
としたときの POST に対するレスポンスはリダイレクトされずにこんな感じで返ります。
<!doctype html>
<html>
<head>
<meta name="chromevox" content-script="no">
<link rel="stylesheet" href="https://fonts.googleapis.com/icon?family=Material+Icons" nonce="VqpfYoudsRHewfIk9ntKYA"><link rel="stylesheet" href="/static/macros/client/css/4179202448-mae_html_css_ltr.css">
<script type="text/javascript" src="/static/macros/client/js/2934561446-warden_bin_i18n_warden__ja.js"></script>
</head>
<body>
<table id="warning-bar-table" class="full_size" cellspacing="0" cellpadding="0"><tr><td><div id="warning" class="warning-bar"></div></td></tr><tr><td style="height: 100%"><iframe id="sandboxFrame" allow="accelerometer *; ambient-light-sensor *; autoplay *; camera *; clipboard-read *; clipboard-write *; encrypted-media *; fullscreen *; geolocation *; gyroscope *; magnetometer *; microphone *; midi *; payment *; picture-in-picture *; screen-wake-lock *; speaker *; sync-xhr *; usb *; web-share *; vibrate *; vr *" sandbox="allow-downloads allow-forms allow-modals allow-popups allow-popups-to-escape-sandbox allow-same-origin allow-scripts allow-top-navigation-by-user-activation">
</iframe>
</td></tr></table><script type="text/javascript" nonce="wRm9H1XNNiYsZ2EiFYaXwQ">
(function() {
var el = document.getElementById('sandboxFrame');
el.onload = function() {
goog.script.init("\x7b\x22functionNames\x22:\x5b\x22doPost\x22,\x22doGet\x22\x5d,\x22sandboxMode\x22:\x22IFRAME_SANDBOX\x22,\x22callbackTimeout\x22:390000,\x22deploymentId\x22:\x22AKfycbzY6wncn0OAfIWqjvAVfAfAH-VOMj2bZOnbbVgKicqg10bSS5CVY3cex7n4ZAnlcMvW2Q\x22,\x22eei\x22:\x22\x22,\x22sandboxHost\x22:\x22https:\/\/n-23m53kfvwzqicugmqpir7yzfhfbvitllc3gjdky-0lu-script.googleusercontent.com\x22,\x22clientSideProperties\x22:\x7b\x22google.script.sandbox.mode\x22:\x22IFRAME_SANDBOX\x22,\x22google.script.host.origin\x22:\x22https:\/\/script.google.com\x22\x7d,\x22actionPrefix\x22:\x22\/macros\/s\/AKfycbzY6wncn0OAfIWqjvAVfAfAH-VOMj2bZOnbbVgKicqg10bSS5CVY3cex7n4ZAnlcMvW2Q\x22,\x22userHtml\x22:\x22\x7b\\\x22answer\\\x22:42\x7d\x22,\x22ncc\x22:\x22\x7b\\\x22awhs\\\x22:true\x7d\x22\x7d", "", undefined, true , false  , "false", "https:\/\/n-23m53kfvwzqicugmqpir7yzfhfbvitllc3gjdky-0lu-script.googleusercontent.com");}
el.src = 'https:\/\/n-23m53kfvwzqicugmqpir7yzfhfbvitllc3gjdky-0lu-script.googleusercontent.com\/userCodeAppPanel';
}());
</script>
</body>
</html>
この中に、userHtml\x22:\x22\x7b\\\x22answer\\\x22:42\x7d\x22 というのがあります。
これを取り出して、エスケープを適切に処理すれば良いわけです。
workaround (M5Stack でも使える方法)
さてどうやろうか、ということですが、今回は単純にターゲット部分を目印となる 文字列(MAGICWORD)で挟む、としました。簡易な方法なのでコンテンツによっては衝突が 起きる可能性もありますが、コンセプトの実証コードということで。
GASのコードはこんな感じになります。素直なやり方 とほぼ一緒で最後の
return だけが違っています。
const MAGICWORD = 'CaLeNdAr'
function doPost(req) {
  const now = new Date();
  const tomorrow = new Date(now.getTime() + 48 * 3600 * 1000);
  const events = CalendarApp.getCalendarById("カレンダーID@group.calendar.google.com").getEvents(now, tomorrow);
  const resp = [];
  events.forEach((e) => {
    resp.push({time: e.getStartTime(), title: e.getTitle()});
    console.log(e.getTitle());
  });
  return HtmlService.createHtmlOutput(MAGICWORD + JSON.stringify(resp) + MAGICWORD);
}
M5Stack の UIFlow はこんなふうにします。Blockly でも書けるはずですが、面倒くさかったので Python で書きました。
from m5stack import *
from m5stack_ui import *
from uiflow import *
import urequests

screen = M5Screen()
screen.clean_screen()
screen.set_screen_bg_color(0xFFFFFF)

MAGICWORD = 'CaLeNdAr'

label0 = M5Label('Text', x=0, y=0, color=0x000, font=FONT_UNICODE_24, parent=None)

def decode(s):
  ret = ''
  while len(s) > 0:
    if s[:2] == '\\x':
      ret += chr(int(s[2:4], 16))
      s = s[4:]
    elif s[:2] == '\\\\':
      #ret += '\\'
      s = s[2:]
    else:
      ret += s[0]
      s = s[1:]
  return ret

def buttonA_wasPressed():
  # global params
  try:
    req = urequests.request(method='POST', url='https://script.google.com/中略/exec',json={}, headers={})
    encoded = req.text
    encoded = encoded[encoded.index(MAGICWORD) + len(MAGICWORD):]
    encoded = encoded[:encoded.index(MAGICWORD)]
    decoded = decode(encoded)
    j = decoded   # json として後から利用する際にどうぞ
    txt = ""
    while len(decoded) > 0:
      txt += decoded[:20] + "\n"
      decoded = decoded[20:]
    label0.set_text(txt)
  except:
    label0.set_text(str((str('failed. status code =') + str(str((req.status_code))))))
  pass
btnA.wasPressed(buttonA_wasPressed)
実行したら (ページトップの写真のように) 見事 Google Calendar から情報を受け取ることができました!